|
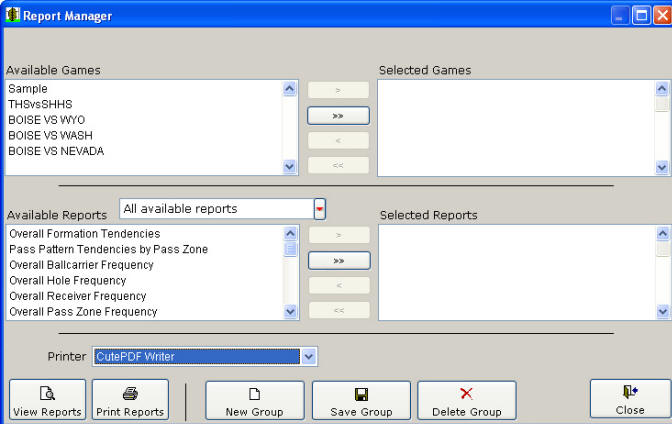
The Report Manager (shown below) enables the user to specify
a list of games and a report using a Mover List. It is then
possible to
view reports, print reports, and save/delete a group of reports for
later use.

Basic Functionality
The Report Manager Form is designed to ease the burden of
printing repetitive reports for games. It allows the user to create
and manage sets of reports that can be printed for any and all
games.
Mover List
A Mover List consists of two scroll boxes and a set of buttons.
The objective is to move the items between the boxes until the
desired selections have been made. Any highlighted selections can be
moved with the > or < buttons. All available elements may be moved
with the > and < buttons. Multiple selections may be made by holding
down the shift key and clicking additional items. Selections may
also be moved by 'double clicking' or by using the 'drag and drop'
method.
Use the upper Mover List on this form to
Select Games.
Use the lower Mover List on this form to Select Reports.
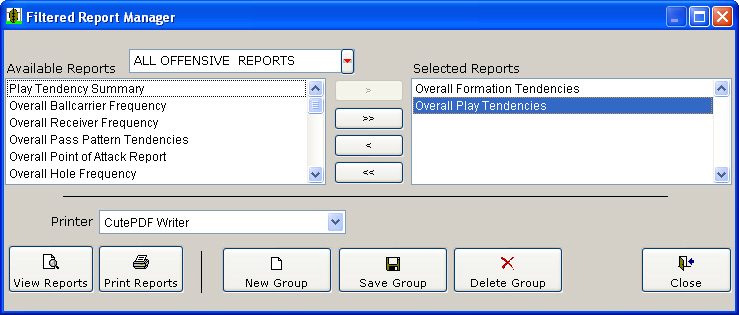
There are two Mover Lists on the
Report Manager and one on the Filtered Report Manager. The
difference is that on the Report Manager, the upper Mover List (shown below) is the
Available Games list. This makes it possible to select a
game or a group of games to generate reports.

A Mover Lists consists of 2 scroll boxes and a set of buttons.
The objective is to move the items between the boxes until the
desired selections have been made. Any highlighted selections can be
moved with the > or < buttons. All available elements may be moved
with the > and < buttons. Multiple selections may be made by holding
down the shift key and clicking additional items. Selections may
also be moved by 'double clicking' or by using the 'drag and drop'
method.
Printing and Viewing Reports
Both the
Report Manager and Filtered Report Manager use a "mover list" to generate reports. Easy-Scout
XP Plus will use
information from the
Selected Games in the upper Mover List on the Report Manager (or the
"filtered" data) from the Analysis Grid to send the
Selected Reports to the Screen or Printer depending which
button/icon is clicked. This allows you to generate a single report
and/or print multiple reports in succession.

There must be at least one
Selected Game (Report Manager) and one
Selected Report (Filtered Report Manager) to print reports.
Tip! Try to review your Report List before sending reports to the
Printer to ensure that you are not tempted to interrupt the printing
process.
IMPORTANT - DO NOT INTERRUPT THE PRINTING PROCESS ONCE IT
BEGINS!
Once your reports are selected, and you choose either View
Reports or Print Reports, you can't stop the Report Engine until all
of the reports are printed (or viewed). You MUST allow Easy-Scout XP
Plus to
send all of the selected reports to the Printer or to the Screen.
If you choose View Reports, clicking the square (stop) VCR button
will close the report on the screen and display the next one until
all reports that you selected are displayed on the screen.
If you choose Print Reports, you will need to wait until the
reports are all sent to your printer.
NOTE: Depending on how your printer is configured, you may be
able to stop some of the reports from actually being printed by
opening the Windows Printer Utility that shows in the lower right
corner and deleted some of the print jobs. Do not attempt this
unless you are an experienced Windows user.
View Reports
Click the View Reports icon to send all of the selected reports
to the Screen in succession. Easy-Scout "hands control" over to the
Reporting Engine until all reports are printed. The toolbar below
will be displayed in the Upper Left corner of your screen when the
Report Engine is running.

In the example above, even though you are in the View Reports
mode, you can Print the report on the screen by clicking the Printer
button on the toolbar. To skip the report, click the square close
(Stop) VCR button. The next report in the sequence will appear on
the screen.
Note the title at the top of the Screen. When the Report Engine
is running the title bar will always display the report name
followed by the .rrw extension. This is an abbreviation for the
report name, which s followed by R&R XBase. Report abbreviations
follow a naming convention that uses the first letter of the name of
the report. For example Overall Formation Tendencies is OFT, Hole
Frequency by Down and Distance is HFDD and so on.
Print Reports
Easy-Scout XP Plus will use information form the
Selected Games in the upper Mover List to send the
Selected Reports to the printer. This allows you to generate a
single report and/or print multiple reports in succession.
Working with Groups

Groups of reports may be defined and saved for later use. These
groups can be managed with the following controls. The default
report group is "All available reports,” as shown below.

The All Available Reports group is automatically loaded on
startup. To select a new group of reports, click the red down arrow
beside the textbox and choose another group from this pick list.
A new group can be created by pressing the New Group
button. The group selection textbox will empty and allow the user to
type the new group name. Next, to save to selected reports in the
group press Save Group the New Group button will
remain active until saved or until clicked again to cancel the
operation.
Appending and removing reports from a group can be accomplished
in a similar manner. Use the VCR buttons to edit the
Selected Reports list and then click the Save Group
button.
RETURN TO INDEX
|