
The Video tagging or editing screen contains the same data entry elements as the main play entry screen, however it is divided in such a way to allow for viewing video while entering data.
The Easy-Scout Video Editing screen will be used when Adding Plays with Video , Editing Plays with Video in a Game and Deleting Plays with Video from a game. The Form is divided into sections to organize the various data elements that Easy-Scout collects. The sections are based on the following grouping logic:
THE HEADER (TOP LEFT SECTION)
The Header collects background information for each play. The information
entered in the top section is known BEFORE the ball is snapped and
usually BEFORE the teams line up. Data elements such as the Series,
Score, Down & Distance, etc. are entered in the Play Header.
When adding information to the Header, most of the data elements will have Default values that are based on information about the previous play.
THE BODY (MIDDLE LEFT SECTION)
The Body of the Play Entry form is divided into three (3) subsections, with TABS that further organize the data elements for a play.
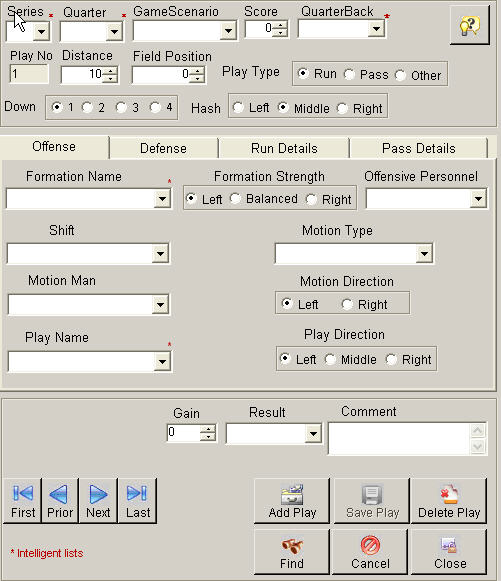
The MAIN Tab shown below contains descriptive information about the type of Formation and Play run by the Offensive team and the Type of Defensive Scheme used by the Defense. Information about Personnel groups on Offense or Defense as well as information about Shifts and Motion used by the Offense can also be entered in this section. This information is collected just prior to the snap and as the play develops.
ADD MODE AND EDIT MODE
The Sample Screen in the illustration above shows what the Play Entry Screen
looks like when it is in EDIT MODE.
EDIT MODE is used to add, edit or delete plays in an existing game while
watching the video.
TAGGING VIDEO CLIPS while watching video is simply a matter of setting the start and stop points in the video clip and saving them with game data. You can record as few or as many data items on the left side as you desire. You can always go back and enter additional items at a later time. You will probably want to record the Down, Distance, Hash and Field Position at least.
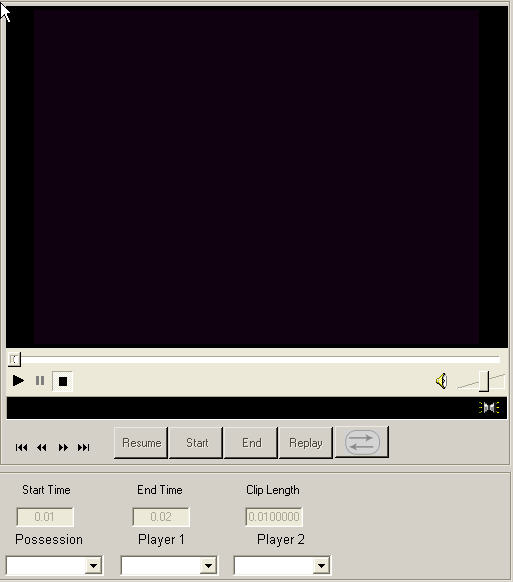
There are three rows of Controls on the Video Tagging Screen.
The top row contains a Slider to advance the play and Play, Pause and Stop buttons. These are usually called VCR controls. A volume control and mute button is also included.
The middle row contains more VCR controls that Advance or Reverse the video either one or three frames. In addition, buttons will Resume a paused play, capture the Start and End timing marks for the play, Replay a clip from the Start time, and Rewind and Play when the mouse button is depressed, held and let go.
The bottom row contains three new data entry "fields" that allow for user-controlled video playback (cutups) (Possession (ODK) and two Player highlight fields). These fields are "lists" that are maintained in Modify Lists on the utility menu. The Players list contains numbers of the players that will be choices in the highlights.
ADD and EDIT MODES
The Add and Edit Modes work in a similar fashion to those found on the data-only screen, however their appearance is slightly different. In addition to moving the controls closer together, the
Any time changes are made and not saved, the option to save or cancel changes
will be presented before the application closes.
In comparison, edit mode provides access to more options than add mode in the
lower portion of the screen.
NOTE: When in edit mode the word edit appears on the Title Bar in the upper left
corner of the Play Entry Form.
The four VCR type buttons on the lower left side of the Play Entry Screen allows
for easy navigation through plays in a single game. The three buttons to the
lower right provide options such as save changes, cancel changes, and delete the
play to the current record. The two buttons in the middle provide a Find
function allows the user to locate plays in a game or ADD plays to the game.
ADD MODE is a special, limited function. This mode provides the ability to add plays one after another very quickly. The benefit of Add Mode is that it "knows" the object is to enter a sequence of plays, and behaves accordingly. After the information about each play has been entered, the Add Mode automatically Saves the Play, advances to the next play, calculates all the default values for the next play based on the play previously entered, and waits for the user to Save and Advance to the next Play! When finished Adding Plays, selecting Exit Add Mode will advance to the Edit Screen show in the illustration below where changes can be made to one or more plays or the Play Entry Screen may be closed.
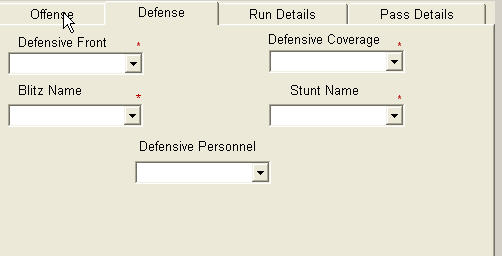
The Sample Screen in the illustration above shows the additional tab for Defensive information on the Edit Video Screen.