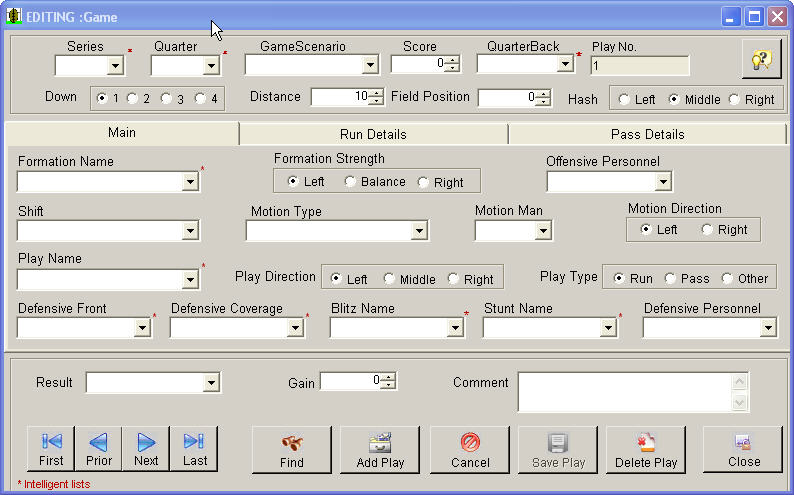
The Easy-Scout Play Entry Form will be used when Adding Plays to a Game, Editing Plays in a Game and Deleting Plays from a game. The Form is divided into sections to organize the various data elements that Easy-Scout collects. The sections are based on the following grouping logic:
THE HEADER (TOP SECTION)
The Header collects background information for each play. The information
entered in the top section is known BEFORE the ball is snapped and
usually BEFORE the teams line up. Data elements such as the Series,
Score, Down & Distance, etc. are entered in the Play Header.
When adding information to the Header, most of the data elements will have Default values that are based on information about the previous play.
THE BODY (MIDDLE SECTION)
The Body of the Play Entry form is divided into three (3) subsections, with TABS that further organize the data elements for a play.
The MAIN Tab shown below contains descriptive information about the type of Formation and Play run by the Offensive team and the Type of Defensive Scheme used by the Defense. Information about Personnel groups on Offense or Defense as well as information about Shifts and Motion used by the Offense can also be entered in this section. This information is collected just prior to the snap and as the play develops.
ADD MODE AND EDIT MODE
The Sample Screen in the illustration above shows what the Play Entry Screen
looks like when it is in EDIT MODE.
EDIT MODE is used to add, edit or delete plays in an existing game.
When in Edit Mode the buttons at the bottom of the screen will become ACTIVE
(DARK) and/or INACTIVE (LIGHT) based on what is being edited. For example, when
Play Entry Screen is first opened in Edit Mode, the Navigation buttons allow the
ability Add a Play. As soon as a change is made, as is the case in ILLUSTRATION
2, the ability to perform other functions such as cancel, save, delete, or find
another play to edit is available.
Any time changes are made and not saved, the option to save or cancel changes
will be presented before the application closes.
In comparison, edit mode provides access to more options than add mode in the
lower portion of the screen.
NOTE: When in edit mode the word edit appears on the Title Bar in the upper left
corner of the Play Entry Form.
The four VCR type buttons on the lower left side of the Play Entry Screen allows
for easy navigation through plays in a single game. The three buttons to the
lower right provide options such as save changes, cancel changes, and delete the
play to the current record. The two buttons in the middle provide a Find
function allows the user to locate plays in a game or ADD plays to the game.
ADD MODE is a special, limited function. This mode provides the ability to add plays one after another very quickly.

The Sample Screen in the illustration above shows what the bottom of the Play Entry Screen looks like when it is in ADD MODE.
The benefit of Add Mode is that it "knows" the object is to enter a sequence of plays, and behaves accordingly. After the information about each play has been entered, the Add Mode automatically Saves the Play, advances to the next play, calculates all the default values for the next play based on the play previously entered, and waits for the user to Save and Advance to the next Play! When finished Adding Plays, selecting Exit Add Mode will advance to the Edit Screen show in the illustration below where changes can be made to one or more plays or the Play Entry Screen may be closed.
NOTE: When in ADD MODE the word ADDING appears on the title bar in the upper left corner of the Play Entry Form.