Use the Application Settings toolbar
button ![]() or select this
option to launch the form shown below.
or select this
option to launch the form shown below.
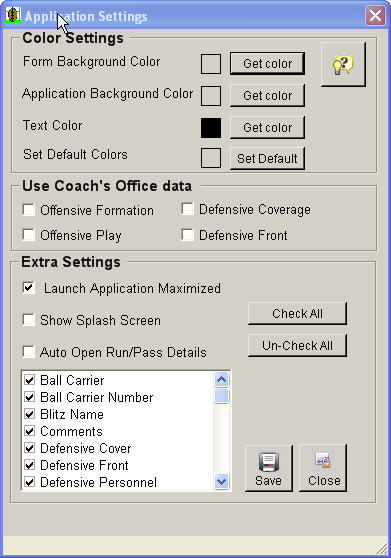
You should see two columns in the grid; Field Name and Visible. If the Visible column is hidden, drag the vertical right margin of the fieldname until it appears. Remove or replace check marks in the Visible column to indicate which fields you wish to use. Use the Check All or Un-check All buttons to change the entire list of Field Names. Click the Save & Close button to save changes.
There are 3 color settings available on the upper portion of this form. These settings can be modified by pressing the "Get Color" button. This will open the color picker, for choices.
- Form Background Color
- Application Background Color
- Text Color
Launch Application Maximized If this option is checked the application will always launch maximized. If this button is not checked the application will open to its previous state.
Show Splash Screen There is a splash screen displayed when the application is first launched. Un-checking this, will suppress the splash screen.
Auto-Open Pass/Run Details - Check this option if you want to automatically open the Run Details or Pass Details screen after the Play Type is selected. For example, if you click Run as the Play Type, you will automatically see the Run Details screen where you can enter the Ball carrier, Hole Hit and Run Type. Each time a new play is started, the Main tab is displayed. You will need to click the Main tab again if you want to enter information about the Defense. If you don't plan to enter Run and Pass Details, leave this option unchecked, which is the Default.
COACH OFFICE DATA
Easy-Scout XP can use data from Coach's Office to build
one or more of the "lists" that are common to both programs. These include
Formation Name, Play Name, Defensive Front and Defensive Coverage.
The settings screen enables the user to select the ones that should be "synchronized" .
When a box is checked, the list choices will be the same as exist in Coachs Office. It is
still possible to type into these "fields" in Easy-Scout XP, however the list will
not be dynamically updated as is the case when the boxes are not checked. This means that the
user would utilize Coachs Office to first draw formations, plays, fronts and coverages and then
enter data into Easy-Scout.
It is always possible to revert back and forth from each setting. Easy-Scout recognizes any
time a setting is changed i.e.( checked or unchecked) and the save button is clicked. Easy-Scout
immediately opens a "file dialog box"to enable the user to locate the Coachs Office
formation.mdb file. Easy-Scout then opens the file and "imports" the Coach's Office data that it
needs. If the "import is successful, the Formation Name, Play Name, Defensive Coverage, Defensive
Front "lists" will display Coachs Office data according to the "boxes" that are checked.
FIELD NAMES
The grid on the lower portion of this form is
used to select which controls are visible on the Play
Information-Main screen. If you don't use a particular Field on that
screen for entering data, you can remove it from the plays form by un-checking
the corresponding check box in the grid. This makes navigating during data
entry much easier, since you will no longer have to tab through items that you
never use.
You should see two columns in the grid; Field
Name and Visible. If the Visible column is hidden, drag the vertical right
margin of the fieldname until it appears. Remove or replace check marks in the
Visible column to indicate which fields you wish to use. Use the Check All
or Un-check All buttons to change the entire list of Field Names. Click
the Save and Close button to save changes.