|
Tips and Tricks for Easy-Scout Professional Users Keyboard Shortcuts The keyboard may be used instead of the mouse if desired. The Tab and Arrow keys will move the cursor between data entry items. The Enter key accepts an option or data entry item and moves you forward to the next element. Help can be accessed from the Menu or by
clicking the Help
In the upper right hand corner of most of the screens you will see a control box to minimize, maximize and close the window or application. It is not recommended that you use the X to close the application, and a number of screens, particularly those that include a video player, can not be resized.
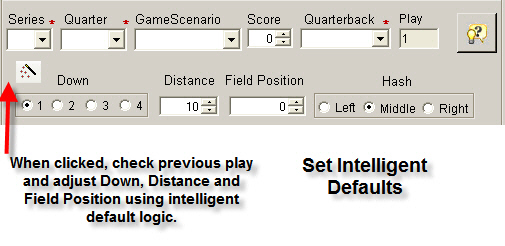
For screens that can be resized, press the center button on the control box to restore/maximize the window. The current window screen will either maximize to its largest available size or it will restore itself to the previous setting. It is important to note that the video screens in particular require a minimum screen resolution of 1024x768 and the application will not expand to a size larger than that. Some of the individual screens, however can be adjusted. Wide screens may cause a slight misalignment of button labels - adjust accordingly. Intelligent Default Wizard When performing what we refer to as "two-pass" editing, one of the most popular time-saving features of Easy-Scout products may be unavailable. This is because Intelligent Defaults are set only when working in "Add Mode" - i.e. when Adding Plays and clicking Save and Add. In "two-pass" editing, a game is viewed in either the Full Video Editor or Quick Cut Editor, but during the "first pass", or "first session", only the Start and End "points" for each play's video, and the "Possession" (Offense, Defense, Kicking - frequently called ODK) for a play is recorded. Then, in the "second pass", information about the play is added, however since each "play" in the game has already been identified, the defaults must be set manually, or the Intelligent Default Wizard must be used. As shown below, a "magic wand" icon is available on the Edit Game->Edit Play screens (both the one with Video, and the one without video). This makes it possible for Easy-Scout Pro to apply the Intelligent Default logic at any time, by simply clicking the magic wand !
Scouting both teams from a single video breakdown From time to time, a single video will have 2 teams that are played at different times in the same season. For example, one team is the opponent in in week #2 and the other in week #7. Easy-Scout Pro has a number of tools that make it possible to "break down" the game "film" of both teams simultaneously, and then analyze and print reports for each team's Offense, Defense and Special Teams later. If it is only necessary to break down both Offenses, we suggest using the Possession Field and adding two items to the Possession List using the Modify Lists function: Offense 1 - this will be first team you are scouting, and Offense 2 - this will be the second team you are scouting. To break down both Defenses, or when breaking down both Offense and Defense for both teams, add similar items to the Possession list for the Defense (Defense 1 for team 1, and Defense 2 for team 2) . Like all lists in Easy-Scout Pro, there is no limit to the number of items that can be added to the Possession list, and this makes it usable in many ways. To perform a multi-team breakdown from the same video, the Possession field can be used in combination with the Split Game Utility. Since the Possession field is visible on both the Quick Cut and Full Video Editor screens, and each displays the user-maintained "pick" list mentioned above, plays can be marked as either Offense 1 or Offense 2 (or Defense 1 or Defense 2) as necessary (see Modify Lists). Quick Cut will be faster, but the full video editor can also record the Down, Distance, Hash and Field Position. It is a good practice to use a game name that matches the use of the Possession labels. For example, Team 1 vs Team 2 matches Offense 1 - the first team you are scouting, and Offense 2 - the second team you are scouting. It may be necessary to abbreviate the game name, adding more details using the game comments to include additional information about the teams that are scouted. Example: Team 1 is North, Team 2 is South. The Game Name would be North vs South. When North (Team 1's) Offense has the ball, set the possession to Offense 1, and when South (Team 2's) Offense has the ball, set the possession to Offense 2. When the initial breakdown is complete, a single "game" will contain all of the plays. For high school, this is usually between 120 and 150 plays per game. The possession will alternate between Team 1 and Team 2 when they are on offense. The possession then can be used to create an individual game (remember a game is simply a collection of plays, either all plays O, D and Kicking, or a subset of the game) that contains only the subset that you want - which in this case are the Offensive plays for each team. With the Start and End and the Possession for each play labeled use the Split Game function (Game->Split Game) to create a separate "Game" (collection of plays ) for each teams offense. For example, North O vs South would be one game and South O vs North would be game two. The end result is actually 3 "games" - the full game that was created when the game was broken down in its entirely, 2 additional "games" created by the Split Game utility that contains only the Offensive Plays for each team scouted. The Split Game Utility is extremely powerful yet simple and straight-forward to use. In short, it enables the user to identify the game that is the "source" or master - the one with all of the plays, provide a name for the new game, and select a value from the possession list to use when creating the "new game". In the scenario above, this (the Split Game function) would be done twice - the first time using Offense 1, the second time using Offense 2. Additional information about the Split Game Utility and the other ways in which it can be used to perform advanced tasks and make using Easy-Scout Professional more efficient is provided in the Split Game section of this user guide.
|
 button.