|
Easy-Cut projects are
often used to create "cutups", which are "new"
movie, or video files.
To create a cutup from
an Easy-Cut project:
-
Add clips to the
Easy-Cut Project Grid or Open an Easy-Cut project file
-
Arrange the clips as
desired using the Filter and sequencing tools
-
Click Export Movie
to open the Easy-Cut Project Output screen
-
Follow these steps to
produce your movie
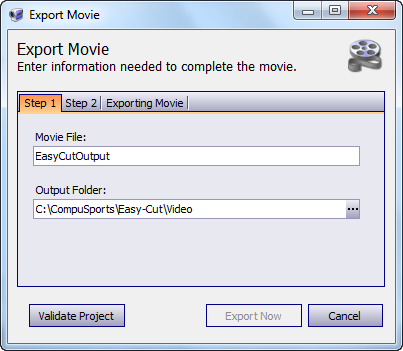
STEP 1 - Name
the Movie (type in or accept the default of
EasyCutOutput), and
specify the Location (Output
Folder) where it should be saved. Use the
ellipsis (...) to browse to a folder.
We do NOT
recommend accepting the default Movie File name
or Output Folder. You can
click the Validate Project button now or wait until STEP
2.
STEP 2a -
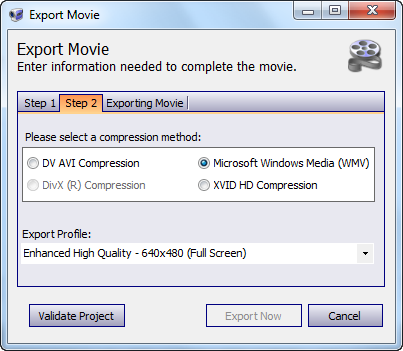
Select the type of Compression Method
that should be used to create the new Movie File.
The "compression method" determines
the type of video file that is created, its
quality, and its size. Windows
Media (WMV), Enhanced High Quality (640 x 480)
is the default compression method.
Easy-Cut includes other types of video
compression, including DV-AVI and (optionally) DIVX for
standard definition video output, and XVID HD
720p or 1080p compression
for high definition video output.
DV-AVI
usually produces the highest quality video for
standard definition and is the recommended format if the source video
format is .avi, the video quality is high, AND the cutup
file will be
burned to a DVD.
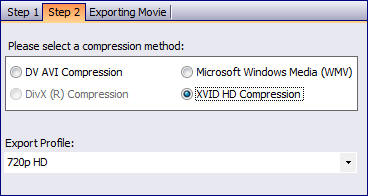
The DIVX and XVID HD formats are
inactive until the respective codec is
installed. In the example below, the (optional)
XVID codec has been downloaded from
www.xvid.org
and is installed, while the DIVX codec
(www.divx.com) has yet to be downloaded and
installed.
Step 2b - Click Validate Project. This is necessary in order to
proceed to Step 3. Validating a project
runs a test that checks the video file type for
each clip. For a project to pass the validation
test, the video clips must all be the same type
(WMV, AVI, etc).
STEP 3 - EXPORT THE MOVIE -
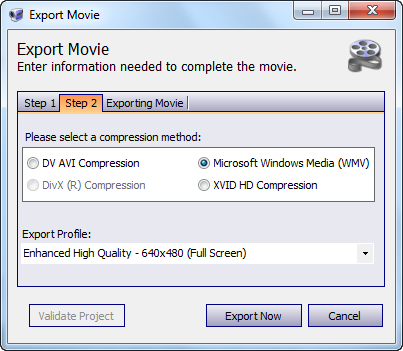
If the project passes the validation test,
the Export Now button becomes active (See below),
and it is possible to Export the Movie.
Click Export Now to make a movie using the
Movie (cutup) File name, folder location and
"compression method" (video quality and size settings)
that you
specified in the previous steps.
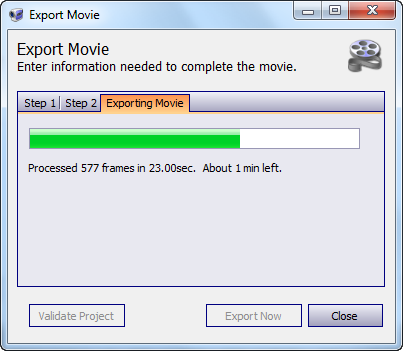
A
progress bar and on-screen status messages
inform you of the progress being made and how
long the process is expected to take. Note the
status bar - it refers to the progress of the
entire project. During "production", a
"conversion" a time estimate is given
for each
clip that is being processed.
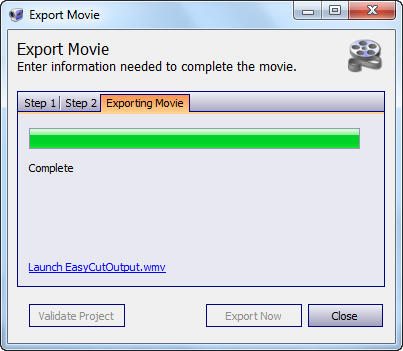
STEP 4 - VIEW
THE MOVIE - The screen below shows a movie "post production". Click the link that
starts with Launch to view your movie in Windows
Media Player.
MORE ABOUT VIDEO QUALITY (COMPRESSION) SETTINGS AND EXPORTING MOVIES
Entire books are devoted to digital video,
with detailed and highly technical discussions of video
quality and similar complex topics. We built Easy-Cut
to keep things as simple as possible without sacrificing
what we thought was "must have" functionality. For those who
want to dig deeper into the video compression settings, we
include discussions of Windows Media, AVI and DivX/XViD.
It is important to understand
that Easy-Cut was designed
to produce (relatively) short cutup files - usually consisting of
no more than 20 plays, or "clips". Easy-Cut can
produce longer cutups, but a number of factors, including the hardware capabilities of
the computer that is being used, the video format of the
original source video files and the number of different
video files that comprise the Easy-Cut project all can
affect the results.
When cutups that are produced by Easy-Cut will be burned to a DVD,
the DVD burning software, rather than Easy-Cut, should be
used to create longer videos, since it is designed for that
purpose. When cutups will be uploaded to a video
sharing web site like YouTube, the cutups produced by Easy-Cut can be used
in their native form. For longer videos, Movie Maker or
similar programs can be used. The settings below are recommendations
based on each "destination".
Viewing on the Computer - Use Play Clip, Project Preview or
Windows Media
Player
Easy-Cut has two video players that can be used for
viewing video cutups without the need to use the "Export Movie"
function.
To View one or more individual plays, Select a row/play in the grid, click the
Play
icon on the toolbar and watch the play as many times as you wish,
using the Space Bar to toggle Full Screen mode .
To View a sequence of plays or an entire project,
use the Project Preview function on
the Output menu. Project Preview which loads the currently
selected of plays in the grid (including filters) and then provides a
continuous play mode that is virtually identical to
viewing a cutup - with better quality. Windows Media
compression
The default setting
(Enhanced High Quality 640x480 Windows Media) will produce a video file optimized for displaying on a computer screen or overhead projector.
While this type of file is also suitable for writing to a DVD using the computer's "burner"
with any number of DVD creation software applications,
the DV-AVI option will produce
better quality and in turn will degrade less when it
is burned to a DVD.
A number
of Windows Media
"compression methods", or profiles are available, including
two that produce significantly smaller video files
than the default setting.
When the smallest file
size is desired, for emailing or posting on a web
site, select one of the 320x240 settings. The video
file size will be much smaller, and the quality will
be adequate unless the video is enlarged to a size
that exceeds 320x240 during playback.
-
Enhanced High Quality
Windows Media (.wmv) - full screen (640x480),
compressed, smaller
than .avi size
-
High Quality
Windows Media (.wmv) - full screen (640x480),
compressed, slightly smaller and lower quality than the
default Enhanced High Quality
-
Medium Quality
Windows Media (.wmv) - small (320x240) compressed and a
very small file size
-
Variable Rate WWW
Streaming (.wmv) - small (320x240) but surprisingly
close to Highest Quality depending on your video source
DV-AVI
compression
DV-AVI compression will
produce the highest quality standard definition video file with the
least loss of video quality, as a general rule.
The DV-AVI setting should be used when burning
to a DVD, as long as the source video is the
same format and size (720x480) and of a good quality.
Otherwise choose the Windows Media format.
DV-AVI files are large in size, and best suited
for extracting plays or small groups of plays
that will be assembled with DVD burning
software, rather than to play back cutups on the
same PC that is running Easy-Cut.
DivX, XVID and
XVID HD compression
Another type of compression supported by
Easy-Cut is the DivX/XVID type of compression.
Both are based on the MPEG 4 standard, but, like
Windows Media and Quicktime, are a form, or
implementation of the MPEG 4 "standard". DivX
and XVID began as essentially the same format.
With improvements in Windows Media formats, and
with the addition of DV-AVI output as an option, DivX is really not necessary, but we
continue to include it in Easy-Cut for backward
compatibility.
DIVX compression will usually
produce standard definition video with a slightly larger file size
than Windows Media, but due to
changes in DIVX
and improvements
in Windows
Media, only slightly better quality
video quality. But, since the DivX
file that is created is an .avi file, it may be more responsive and precise
during playback when pausing, advancing and reversing the
video.
DivX compression should
only be used
when the source
video files are
720x480 to
minimize loss of
video quality
during the
export function.
The best DIVX
output results
will be achieved
when the source
video is either
uncompressed DV
AVI, DIVX-AVI or
XVID AVI with
dimensions
(resolution) of
720x480.
The DivX output
size is 720x480
(the same size
as Standard
Definition DVD
Video)
. The DivX for Windows codec can be downloaded at
www.divx.com.
In summary, for the highest quality
video output, capture and edit video that is in an .AVI
format, ideally DV-AVI if available, or XVID format. We call
this your "SOURCE" video. Then, Export the Movie in DV-AVI , Windows Media
or XVID-HD, depending on the
factors mentioned above.
* XVID Standard and High Definition
video files are supported in Windows
7 and 8, however it is usually necessary to download the Xvid Codec
in order to play many avi files in
Windows XP and Windows Vista. Since all XVID codecs
are not alike, we recommend that you go to
www.xvid.org to download
the XviD codec if you need it.
XVID HD Compression is
new to Easy-Cut in Version 5. When the XVID HD Codec
is installed, two XVID HD Profiles will be available for
Export Movie Output : 720P and 1080p. As a general
rule, 720P should be used, since most "source" video, once
converted to .avi or .wmv format, will lose some of its
resolution during the conversion process. The default
profile for XVID HD is 720P, as show below:
|