|
Easy-Cut's Project Grid uses columns to enable the
user to categorize video clips by entering data about
each clip. As mentioned earlier, there are four
"system" maintained columns, one built-in Description column
and either 2 (Version 2.x) or 6 (Version 3) Category
columns.
Columns can be "customized" by the user,
making it possible to
record many different types of information about plays, or
video clips. Columns can then be used to sort, search
through (find) and filter the plays or clips in the project.
Easy-Cut provides two types of
"customization" for the
column headings in the Project Grid,
Categories and Custom Column headings. Categories are
located on the Video Editor and the Product Grid, and by
default are labeled Category 1, Category 2, etc. In
Version 2, the Category 1 and Category 2 labels are fixed,
and their contents are updated only when the user selects
ADD CLIP.
In Version 3, the
Category label functionality is more powerful, and there are
4 additional Category labels. Both Category labels and
Custom column names are applied when a new project is started.
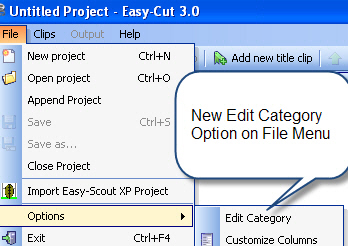
To Customize Columns
or Edit Categories (Version 3 Only), select Options
from the File Menu
Working with Category Labels (Version
3 only)
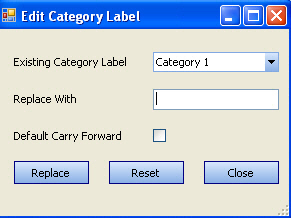
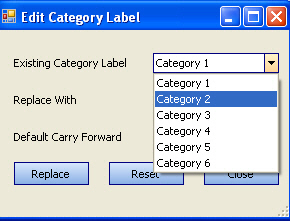
Select Edit Category to open the
Category Label editor. The screen to the lower left
opens and Category 1 and its settings are displayed. When
first installed, the Replace With text box will display
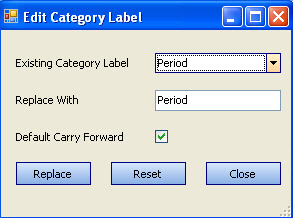
Category 1. In the example below, the backspace key
was pressed to remove the label and then a new label name,
"Period" was typed.
Since the Period, Quarter, Half, etc
are likely to remain constant for a number of plays, or
clips, the Default Carry Forward box is checked in the
screen to the lower right. This has the effect of
"retaining" or "carrying forward" the default value for
Category 1 from one clip, or play to the next, until it is
changed by the user.
|
 |
 |
 |
Default Carry-Forward - a
time saver
The benefit of the Carry Forward type of Default value is
that if there are 20 plays in Period 1, that Category label
will be completed automatically for all 20 plays.
Since Category labels are configured independently from one
another, it is possible to have as many Category labels
configured this was as is necessary. |
Customizing Columns
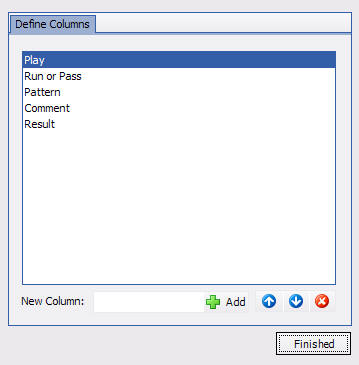
In addition to the built-in Category labels, Easy-Cut has a
Custom Column feature that makes it possible to Add Columns
and Organize the order in which they appear. The Define
Column screen is shown above. To
ADD
columns, type the name in the New Column text box and click
ADD. To rearrange the order in which columns will appear in
the Project Grid, use the Up and Down arrows and to remove a
column, click the Red Delete button.
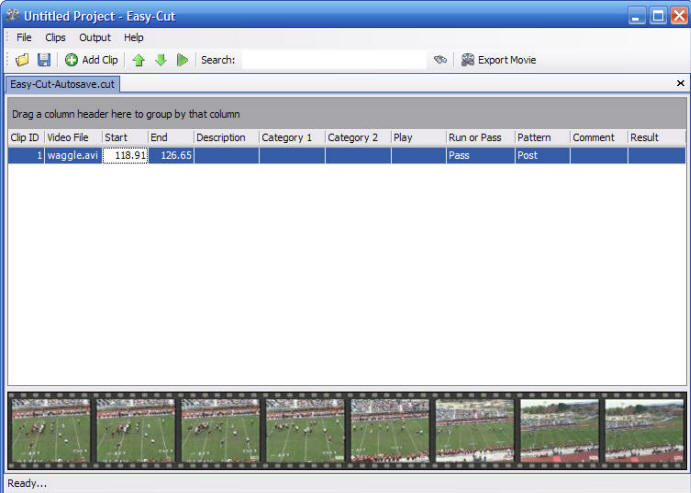
The sample project grid below
shows the two built in Category 1 and Category 2 fields as
well as user-defined, custom columns as they appear when a
new project is created. Initially, the custom columns
appear to the right of Easy-Cut's built-in, or default
column headings. While the built-in columns and default headings can not
be changed or removed (except as outlined above), they can be resized and moved from left to right
to change their appearance in the project grid to suit
individual requirements.
The biggest difference
between custom column headings and Category labels is that
Custom Column headings appear ONLY in the Project Grid.
To enter data into a Custom Column, click directly in that
column and begin typing. To save the contents of a column,
click in another column or press Tab.
Important Notes about Columns:
-
Changes in column names or their order
will affect all new projects created after the changes are
made.
-
When existing projects are loaded
into Easy-Cut, their column headings and order will
remain as they were when that project was created.
-
If a project is imported from
Easy-Scout XP Professional, the columns from Easy-Scout
will over-ride the columns configured with the Customize
Columns feature.
-
Only the Category
1, 2, etc and Description "fields" appear on the Video
Editor. Data is entered into the Custom Columns by
typing directly into the column.
-
To
View a Play, or Clip, use the Play Clip button to view
it from Start to Finish, one or more times, then close
it to record the column or column information that
describes that play.
|