|
Editing Video with Easy-Scout Professional Editing Video is a process that involves recording information about a play and identifying the point in the video of the game where each play begins and ends (called the Start and End point of each play ). Before it is possible to view and edit video in Easy-Scout Pro, it is necessary to have Video on one of the computer's hard drives (either internal or external), and, ideally, in one of the supported video formats - either Windows Media (.wmv) or AVI (.avi).*As a general rule, an AVI file works better than a WMV file as an input format, however in Windows 7 and 8, it is both possible and easier to work with MPEG 2 (Windows 7) and MPEG 4 files (Windows 7 and 8). Easy-Scout Pro is designed to work with a number of video formats. The video must be on an internal or external drive that is accessible from the computer running Easy-Scout PRo. There are a variety of ways in which video can be transferred to the computer's hard drive and saved in one of the recommended video-editing friendly formats. Some of these are illustrated in our video tutorials and discussed in a Question and Answer discussion of video capturing and conversion available here, and on the Easy-Scout Pro CD. With Video stored on the
computer's hard drive, the next step in the Video
Editing process is "tagging" (also called indexing) one or more video clips for playback. "Tagging", or
indexing, is
nothing more than recording the Start and End "video pointers" for each play
while viewing it on the computer screen and recording information that
identifies the play using a variety of "data elements", or attributes, such as Down,
Distance, Formation, Run/Pass, etc.
When a game has been associated with a video file, it will be possible to add, modify and delete plays in that game while watching the video at the same time. Easy-Scout Pro has two Video Editing "forms" or screens that can be used to watch video, record the beginning and end of each play, and record information that identifies the play.
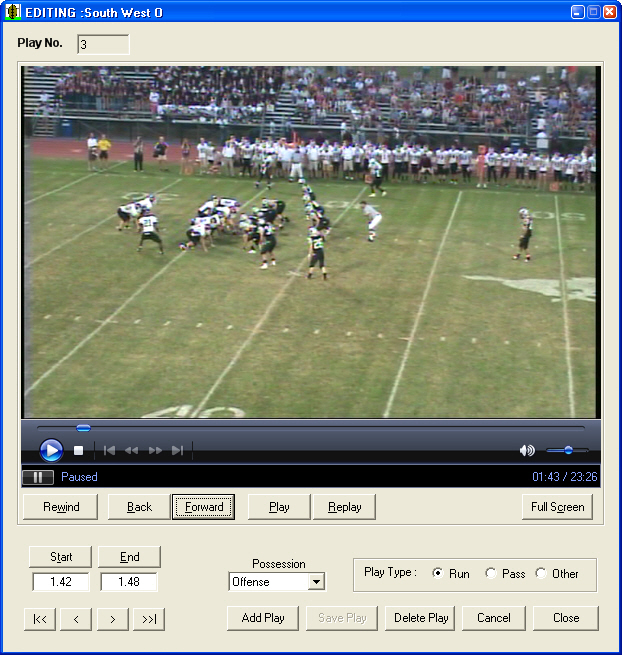
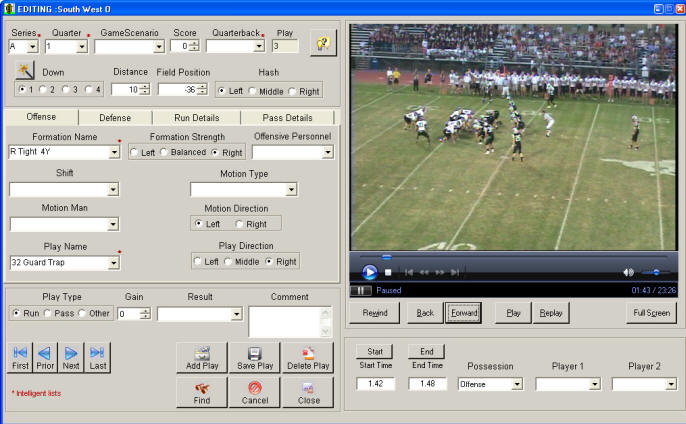
The difference between the two screens is primarily the data items that can be completed with each one. The Quick Cut Editor is ideal for while watching a game for the first time, particularly if and when only a limited amount of information about each play will be recorded. For example, coaches often begin by identifying plays by the type of Possession (Offense, Defense, Kicking), and sometimes by the Play Type (Run, Pass, Other (kicking)). When only the Offense, Defense or Kicking plays are "indexed", or when they are indexed first, the process is sometimes known as an ODK "cut". The Full Video Editor, while it can also be used to perform an ODK cut, has a full collection of data attributes for recording things like the Formation, Play, Down and Distance and to mark plays for inclusion in Player or Team highlights. Many coaches like to do what we refer to as "two-pass", or 2 step editing, wherein the first step is to create an ODK cut with the Quick Cut Editor and the second step is to complete the additional information using the "full" Video Editor. The screen shots below illustrate the Quick Cut and Full Video Editor screens from Version 3.5. Users of earlier versions will notice that the video controls have changed, and we think improved a bit in their simplicity and functionality when compared to prior versions. In addition, the video playback buttons and controls are now IDENTICAL on the Quick Cut Editorm, Full Video Editor and Video Analyzer.
The "Full Video Editor" screen is divided into sections to organize the various data elements that Easy-Scout collects.
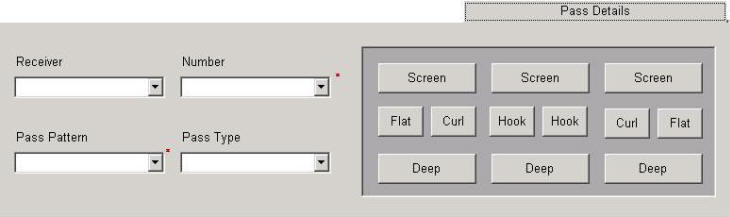
The "data" portion to the left of the video editor screen is divided in such a way to allow for viewing video while entering data. Screen "tabs" on the Video Editor screen organize the data collection items into Offense, Defense, Run details and Pass details. Clicking on the Defense, Run Details, or Pass Details "tabs" displays the items in each category for data entry or editing. The four VCR type buttons on the lower left side of the screen allow for easy navigation through the plays in the current game. The buttons to the right provide options for such as save changes, cancel changes, and delete the play. The two buttons toward the middle of the screen provide a Find function for locating one or more plays in a game or ADDING plays to the current game.
A change to any of the data items, or to the video
Start and Stop settings will trigger a message if the play is not saved before
one of the navigation buttons is clicked. When finished Adding Plays, selecting Exit Add Mode will advance to the Edit Screen show in the illustration below where changes can be made to one or more plays or the Play Entry Screen may be closed. * NOTE: The Intelligent Default "Wizard" button, located above the Down "radio buttons" performs a similar function to Add Mode. When clicked, the Intelligent Default "wizard" looks back to the previous play, and calculates the Down, Distance and Field Position for the current play. It then pre-fills these values, along with "carry forward" defaults for things like Series, Quarter, Quarterback number, etc. WORKING WITH VIDEO - Overview VIDEO PLAYBACK is accomplished with the Video Player and the various controls on the right side of the Video Editor screen. Using the Video Player, it is possible to watch a play numerous times, reverse and advance the video clip and even display the video in full screen and "toggle" back and forth. "Editing" video is simply a matter of setting the Start and Stop points according to the Beginning and End of a Play, and then saving the play. The Start and Stop points are then saved with the game data. Easy-Scout is designed to display video properly regardless of the number of data items that are completed on the left side of the screen. As long as the Start and Stop points of a Play are marked, the video can be retrieved easily and additional date items can be completed at any timer time. It is a good practice to record at least one distinguishing piece of information for video playback - which can be done easily with the Possession "field" explained below. USING THE VIDEO PLAYER
There are two rows of "controls" on the Video Editor portion of the Video Editing screen. The top row contains a Slider to advance the play, a Play/Pause and a Stop button (highlighted above in black). The Play button will begin playback and "toggle" between Play and Pause. The set of four small "VCR style" buttons next to the Stop button are "greyed out" in the image above, and reserved for future use. In some cases (such as when using Windows Media files), additional functionality will "automatically" be available for the << and >> buttons. A volume control and mute button is also included in the top row to the right to control sound.
The second row contains BACK and
FORWARD buttons that make it possible to position the play with great precision.
These buttons are used with the video in Pause mode. To mark the beginning and end of a play, click the START and END buttons. This can be done with the play running or paused and adjusted as many times as necessary. Each time one of these buttons is clicked, the "counter" is updated with what is called the "timing" mark for that exact location in the video file. The REPLAY button will be used MORE than any other video control. When clicked, it will begin playing the video from the Start point, regardless of where the video "pointer" is at that moment and will pause the video at the End point. If no Start point is marked, it will begin playback at the end of the previous play (if one exists), or at the beginning of the game. The REWIND AND PLAY "cowboy clicker" button will Rewind the Play while the mouse button is clicked and held down, and begin Playback immediately when the mouse button is released. This is different from the BACK button, which will not automatically begin playback on the release of the mouse button. The FULL SCREEN button will load the video clip into Windows Media Player and fill the entire screen. To return to the Video Editor, "double click" in the full screen player or press the ESC button on the keyboard. * NOTE: In Version 3.5 and later, each of the Video Playback buttons, the Start and End buttons, and the Full Screen button can be clicked or "pressed" by using the ALT Key and the letter that is underlined on the button when the ALT Key is pressed. For example, ALT P has the same effect as moving the mouse over the Play/Pause button and clicking the button. In addition, a "Slow Motion" speed control (ALT - O) will toggle the playback between normal and slow motion. The Speed Control works on Windows 7 for most video file types, and for Windows XP and Vista with WMV video file types. The bottom area of the video editor screen (shown below) contains attributes of the video clip. The first two attributes are will be "updated" each time the Start and End buttons are clicked.
Using the Possession and Highlight Fields Next to the Start and End display boxes are three additional "fields" that serve as video attributes and allow for user-controlled video playback (cutups): Possession, Player 1 and Player 2. All are "lists" that are maintained in Modify Lists on the utility menu and completely customizable. The Possession field (Offense, Defense, Kicking, Punt, Punt Return, etc) can be used by itself to simplify the playback of play types in a game. For example, all Punts, all Kickoffs, all Offensive plays. The Possession field can also be useful if a game is "broken down" all at one time - meaning it contains both Offensive and Defensive plays. For maximum scouting report flexibility, particularly when breaking down opponent video, consider keeping the Offense and Defense separate - each having its own game name. Note: Possession is an "Intelligent Default". When set, it will retain the same value as plays are added sequentially, and need only be changed on the Possession. This is particularly useful when taking the approach of marking ODK (Offense, Defense and Kicking) first, then returning to "fill in" the detail. The Player 1 and Player 2 fields can be used to identify one or two Players per play (usually by Jersey Number) for producing a highlight video. Like the Possession field, the Player fields are maintained with Modify List. These two fields are combined into one field called Highlight, which is visible only in the Video Analyzer. By combining Player 1 and Player 2 into the same field, Easy-Scout Pro makes it easy to retrieve plays based on the Player number using the "contains" value in the Video Analyzer. Refer to the Help section on the Video Analyzer for further details on producing cutups and highlight video clips, as well as using its powerful "search and filter" capabilities. |

