|
Easy-Cut projects consist of
one or more "clips". The clips in the project can be
"scenes" (plays) from the same video file (or game) or more
than one video file. In sports, this could be a single play
in a game, a group of plays in a game, a period of time in a
game, or an entire game.
While it is possible for
Easy-Cut to combine video clips from different video files
and video formats, mixing video file types is not
recommended.
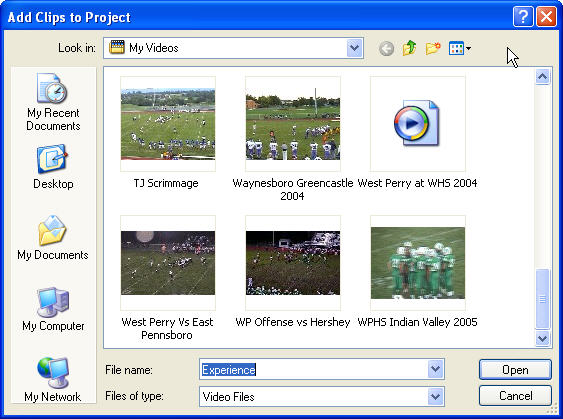
Click the ADD Clip button
on the Easy-Cut Toolbar to open the dialog
box that is shown below.
This is where you will select one or more digital video files
(called clips) to add to your Easy-Cut project.
* The image below was
made with Windows XP. Windows Vista, 7, 8 and 10 will look
slightly different.
Easy-Cut Version 5
makes it possible to add multiple video clips to a project
at one time.
To add Multiple clips at the
same time hold the shift
or control key down while selecting clips, and then click
Open. All selected clips will be added to the project,
with a new Row in the grid for each clip. The Start and End
displayed in each row when a clip is added will be set to
the actual start and end of the video. This can be changed
later using the Easy-Cut Video Editor.

While Easy-Cut
can play many video file formats, the best
results and full functionality will be obtained with using .avi
or WMV video files.
After selecting the video clips you would like to add to the project,
Click Open. Easy-Cut determines whether you
have selected a single video clip or multiple video clips, and
displays either the Video Editor screen or Project Manager screen
respectively.
1. The Video Editor Screen
appears if you select only one video clip The video is positioned to begin editing. At the top of the screen you will
see the file name and folder location of the clip.
2. The Project Manager
screen appears if you select more than one video clip, with each
clip appearing in its own "row", and a number of default values
automatically filled in - the video file name, Start Time (always 0.00) and
End Time (always the "end" of the video clip).
* Note 1 :
To Open the Video Editor to add or change information for an existing
clip in an Easy-Cut project, position the mouse over the Video File Name
and "double click" to open the Video Editor. The button in the lower
right will display UPDATE CLIP instead of ADD CLIP, and when clicked,
with return to the project manager, where another clip can be Added or
Edited.
*Note 2: The "multi-clip add" feature was designed
to be used with newer cameras that create multiple clips, such as those that
record to Hard Drive or Flash Camcorders. The clips MUST be
converted to .avi or .wmv format before you attempt to add them to an Easy-Cut project
or some Easy-Cut functionality will be negatively affected.
THE VIDEO CLIP EDITOR

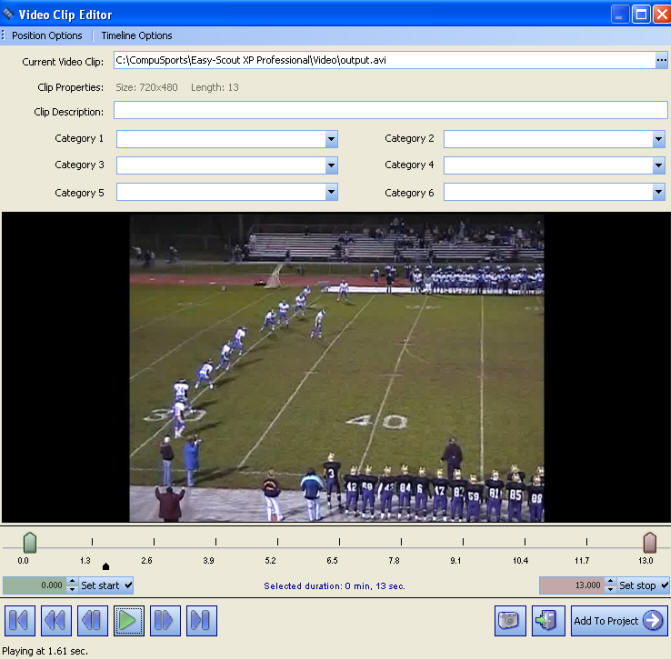
Easy-Cut Video Editor Screen
The Video Editor
is used to watch video, identify clips, plays or
scenes with
information, and either ADD them to an
Easy-Cut project, or UPDATE an existing clip in an Easy-Cut
project. The Video Editor consists of a Video Display area with
video counter in seconds, Set Start and Set End buttons, and
a "toolbar" for controlling video playback and "editing
functions".
Easy-Cut includes 6 Category drop down lists on its Video Editor in addition
to the Clip Description. Category labels can be
changed at any time (see File->Options), and affect only future projects.
Using the Video Editing
and Video Playback Controls
Click the Play button
to start the video playback. The Play button acts like a "toggle
switch" between the
Play and Pause functions.
In order for a clip to be "valid"
for addition to an Easy-Cut project, only the Start and End
times of the video must be present, and Easy-Cut sets a
default for each. To select a "scene" or adjust the
beginning and end of the play, use the
Play/Pause, Set Start, Set End and when finished
click either the Add to
Project (if you adding a new clip) or Update Clip
(if you are updating a clip that was present in the project) buttons.
Easy-Cut provides a number of
additional video navigation buttons as follows:
-
The |>
(Forward) and |< (Backward) buttons advance the video
one "frame" at a time
-
The <<
Rewinds the video
-
The
<| (Go to Start) and >| (Go to End) buttons position the
video at the Start and End times that are recorded for
that video clip and displayed in the respect video
counter
-
The Green and Red "sliders" can be
positioned manually by left clicking and dragging, or by
using the Position Options menu to Reset the Start and
End points respectively
-
Clicking and Dragging the Green "Slider" enables
you to navigate through a video frame by frame.
The FILE OPEN button at
the upper right of the screen is used
to change video files. Only one video file at a time
should be selected. Easy-Cut will always remember
the video file that was last used with the project. To
select a new video file, click the ... icon to display the
Select Video File dialog.
Easy-Cut's "built in"
Categories and Description "fields" make it possible to record
information about the play, or clip.
The Description field is a "free form" text
entry box, while the six Category fields accept text or numeric entries (the
default is text).

Easy-Cut Version Video Editor with Category Labels configured for
Basketball
The Category
drop down lists are automatically created
from the values used in the respective column in the active project. This
makes it possible to select a word or phrase from a drop down list or to use
the quickfill capability by typing the first few letters. Description and Category
fields are visible in the Project
Grid and the Project Preview window to aid
in managing projects and performing selective playback on
one or more plays. In addition to the built-in fields, it is possible to
create as many custom fields (columns) as necessary for recording additional
information about each clip, scene or play (see
File->Options->Customize Columns)
The Category "fields" have labels and "properties" that can be adjusted
using the Category Labels function (File->Options->Category Labels).
Categories can also be configured with a special
"carry forward" default value. A "carry forward" default
inserts the entry from the previous clip (play) - a very useful when repeating
certain types of plays, for example.
The ADD TO PROJECT / UPDATE CLIP button
changes according to whether a new clip is being
added to a project or an existing clip is being edited.
The Snap Shot button
will create a picture file of the video on the screen at the
current time, however it is "picky" about the pictures it
will take. If it can't make a snapshot of the image on the
screen, it will display a message to this effect.
The EXIT button closes
the Easy-Cut Video Editing Screen and returns to the Project
Grid.
|