|
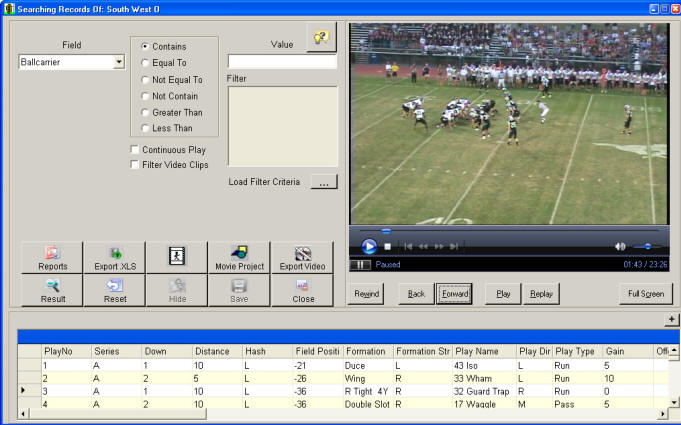
Using the Easy-Scout Professional Video Analyzer Easy-Scout Professional includes a Video Analyzer screen to View the plays, or video clips, from one or more games. The Video Analyzer combines the ability to locate, filter and "play back" a specific play or a group of plays as well as "send" the plays displayed in the Analyzer Grid to another module for reporting or creating cutups, or to a file for analysis in other programs like Microsoft Excel, Easy-Cut and Coach's Office. UNDERSTANDING THE FILTER (SEARCH) TOOLS The Video Analyzer screen includes powerful
and easy-to-use tools in the upper left of the screen that make it possible
to control "which" plays appear in the Analyzer "Grid" at any given time.
This is done by creating a Filter, sometimes called a Search. A
Filter consists of one or more "criteria" that, can be applied
to the games and their plays that are loaded into the Analyzer Grid to
determine which plays are displayed. In Versions 3.11 and later, Filter "Criteria" can be Saved (perform a Search, then click SAVE to name the filter) and retrieved (click Load Filter Criteria and select a Saved Search) to reduce the keystrokes required to apply various criteria to the games loaded into the Analyzer Grid. (see the video tutorial on this topic for more details.). OPENING THE VIDEO ANALYZER To launch the Video Analyzer, select
View Games from the
Menu or
Toolbar, select the game or games to
be analyzed, check the Show Video box, and if necessary, the Intercut
checkbox to determine how plays will be displayed (collated rather than
sequentially).
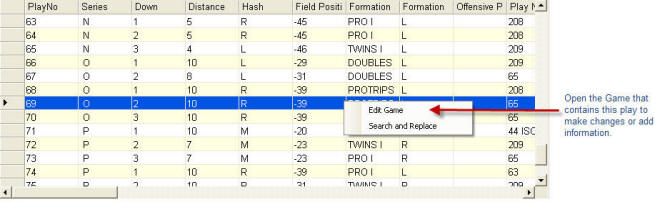
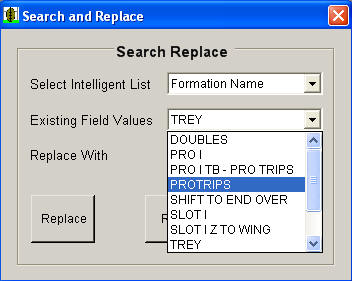
The grid on the lower portion of the form is customizable - column widths can be changed by dragging their vertical borders, and columns can be repositioned by clicking in the middle of the column heading and dragging to the left or right. Clicking on a single play in the grid will begin video playback. Clicking on the Reports button will open a special version of the Report Manager for printing "filtered" reports with the plays that are active in the grid. Clicking on the Export XLS button will enable you to save the plays that are active in the grid to an XLS file. Clicking on the Movie Project button will enable you to save a Movie Project - a list of plays that you can later retrieve and use with the Export Video module. The Movie Project will consist of plays that are active in the grid. Clicking on Export Video will open the Export Video module for producing cutups with the plays that are active in the grid. * In Version 3.4 and later, Export Video capabilities became an optional add-on, and offered as a Video Publishing module. Users of the Easy-Scout Pro Video Scouting Edition can activate this module by simply providing a Video Serial Number. Using the Filter (Search) Capabilities The upper portion of the Video Analyzer screen enables the user to specify criteria that can be used to "filter" the list of plays displayed in the grid. You do this by selecting a data item, or "field" and a comparison "Operator" that will produce the desired results. Field is the first "drop down" list, and it allows the user to choose the data element that will be used to perform the Search. Simply click the drop down arrow and select the desired item, or begin typing the item name if it is known. The item will appear in the selected box. Operator Next to the Field list is a group of "radio buttons" that make it possible to indicate the type of search to perform. Different options are available depending on the type of field that has been chosen. Value is the area where the search value is specified. When the OPERATOR is EQUAL TO, a "drop down list" makes it possible The data placed in this box is not case sensitive. Continuous Play - Check this box to play the Video Clips for the plays in the Grid sequentially. Filter Video Clips - Check this box to remove plays from the Grid that do not have valid video clip settings. See Exporting Data, Movie Projects and Video from the Easy-Scout Professional Video Analyzer for additional information about the row of buttons on the left side of the Video Analyzer. * Right Click Menu (Version 3.0 and later) - Two tools that can dramatically increase productivity by saving time when it is necessary to add or change information for one or more plays are accessible from the Shortcut menu that appears when a row on the Easy-Scout Pro "grid: is "right clicked", as shown below. These two options launch the Edit Game and Search and Replace utilities. Selecting Edit Game from the shortcut menu automatically opens the game that contains the play that is selected in the Grid. The grid closes and either the Video Editor (if video is present) or the "scouting mode" Play Entry screen opens, depending if video is connected to that particular game. Once in Edit Mode, data can be edited, added or changed. Selecting Search and Replace from the shortcut menu opens the Search and Replace Utility that makes it possible to change all instances of a "value" in one of the Intelligent Default Value "fields". Search and Replace can also be accessed from the Utilities Menu. For example, if a Formation Name was entered incorrectly, all instances of that Formation Name in all of the games stored in the Easy-Scout Pro database can be changed with a few keystrokes.
Activating and Resetting a Search After a search criteria is specified in the upper portion of the Video Analyzer screen, click the RESULT button (shown below), located in the middle of the Video Analyzer screen, to apply that Search Criteria and perform the Search and display a new set of plays in the grid. To Reset the Search and
redisplay ALL plays from the selected games in the grid, click Reset.
See also View an Existing Game.
|